Rambling Developer

Recent Posts


Archives


Rambling Developer

Rambling Developer


Double Click Enabled Flex Spark DataGrid Example

Enabling the double click property on a Spark DataGrid is very simple except for one simple gotcha.

First, the obvious: In order to make a spark datagrid double clickable, you need to set the property doubleClickEnabled to “true”.

Next, the part that always trips me up, is that you need to set the editable attribute on the datagrid to “true”.  This will allow you to double click one of the default text item renderers and edit the text within the data grid cell.  View a the sample data grid code below:

<s:datagrid id="personDataGrid" editable="true" doubleclickenabled="true" dataprovider="{new XMLListCollection(namesXML.children())}">
  <s:columns>
    <s:arraylist>
      <s:gridcolumn headertext="Name" datafield="@name">
      <s:gridcolumn headertext="Role" datafield="@role">
      <s:gridcolumn headertext="Movie" datafield="@movie">
    </s:gridcolumn></s:gridcolumn></s:gridcolumn></s:arraylist>
  </s:columns>
</s:datagrid>

With these two attributes you can allow double click editing of any cell in a Flex Spark DataGrid.

An example of this is shown below. You can right click the example to view the source.

adminadmin

Getting Selected Values of a Flex List of Checkboxes

This example will be a continuation of the post “Creating A Flex Spark List of Checkbox Bound To XML DataProvider”. If you have not read that tutorial and are not sure how to create a List of Checkboxes form XML, please see that tutorial first.

Now, we will need to do severals things to know the selected value of our list items:

Add a “selected” attribute for each person in our XML dataprovider
Update the checkbox in the itemrenderer so that it is selected only when the dataprovider’s “selected” attribute is “true”
Add a method to update the dataprovider for the itemrenderer
Add a method to setup an EventListener to be notified of changes to the dataprovider
Add a method to extract the current selected values from the dataprovider
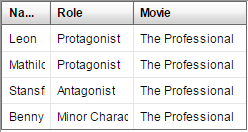
So, first, we need to add the “selected” attribute to our dataprovider elements. That is done quite simply as you can see below:

<fx:xml id="namesXML" format="e4x">
  <people>
    <person name="Leon" selected="false">
    <person name="Mathilda" selected="false">
    <person name="Stansfield" selected="false">
    <person name="Benny" selected="false">
  </person></person></person></person></people>
</fx:xml>

Next, we need to update the definition of the checkbox so that it shows a checkmark only when the dataprovider’s “selected” attribute is true. We’ll also need to update the checkbox definition to call a method called onCheckboxChange when the checkbox sends a “change” event. We can see that definition here:

<s:checkbox id="checkBox" label="{data.@name}" change="onCheckboxChange(event)" selected="{data.@selected=='true'}">
</s:checkbox>

In order for that selected attibute to update in the dataprovider when the user clicks it we need to add the onCheckboxChange method seen in the definition above. This method will set the “selected” attribute to true when the checkbox is checked and false when the checkbox is not checked. Simple, right? You can see the method here:


protected function onCheckboxChange(changeEvent:Event):void{
  //When the checkbox changes update the data provider's "selected" attribute
  data.@selected = checkBox.selected ? "true" : "false";
}

Ok. Now we are almost there. Next, in our applicaton file, we need to create two methods. The first will be onCreationComplete, which will fire when the application has been created (note: this method is triggered by the application definition with the code creationComplete=”onCreationComplete()”). This method will populate a variable called “personDataProvider” which is the dataProvider to our list. Then we will add an EventListener to the personDataProvider that listens to CollectionChange events so we know when a user is selected or unselected. The method is below:


protected function onCreationComplete():void{
  //Initialize the dataprovider
  personDataProvider = new XMLListCollection(namesXML.children());
  //Add a listener so we know when the dataprovider is updated
  personDataProvider.addEventListener(CollectionEvent.COLLECTION_CHANGE, onListChange);
}

Finally, we simply need to create the final method which is called every time the personDataProvider is updated. This method simply loops over all of the person elements in our list, finds which people are selected, and then adds their names to a text element. See the code here:


protected function onListChange(changeEvent:Event):void{
  //Clear the selected person text since we'll be building it here
  selectedPersonText.text = "Selected People:";
  for each (var personXML:XML in personDataProvider) {
    //Add all selected person names to our text component
    if(personXML.@selected=="true"){
      //Add the person's name to the text component
      selectedPersonText.text += " " + personXML.@name
    }
  }
}

That’s it! We now have a way of finding out which people are selected in our checkbox list. See the example below (you can see the source code by right clicking on the example application):

adminadmin

Apache Flex getting the Falcon compiler

If you’ve ever had to compile a huge Flex project, you’ll know that it is no fun needing to wait 10 minutes while your code compiles.  That’s why it’ll be big news once the Apache Flex community gets it’s hands on the new Falcon compiler that is being donated from Adobe.

Besides promised speed improvements for the compiler, here are the other goals of the Falcon Compiler:

  • Use less memory
  • Provide code checking for IDEs (ie, you’ll get to see if there are any syntax problems quickly and easily in Flash Builder
  • Improved runtime performance for compiled code

Even if only some of these items are ultimately delivered, the Falcon Compiler will be a huge improvement for Flex.  The ability for quick compiling will be a much needed time savings for developers since UI development has a ‘write code’,  ‘see how it works’, ‘update code’ process.

With the addition of getting accurate and quick syntax warnings and errors in an IDE, it’ll further quicken the development process.

Despite all of the great goals of the new Falcon Compiler, only the actionscript portion of the compiler is complete and this is the production ready piece to be donated to Apache Flex.  Therefore, the community will need to take the compiler across the finish line and flesh out the current ‘alpha-quality’ MXML support.

Overall, the donation of the Falcon Compiler from Adobe will be a huge improvement for Apache Flex in terms of speed, IDE code checking.

adminadmin

Flex Tree with variable height item renderers

Creating a Flex Tree with variable height rows can be mysteriously difficult if you are new to Flex item renderers. This cookbook will give you the step by step instructions to creating a Tree control with variable height renderers.

First you will need to define your tree component:

<mx:Tree itemRenderer="{new ClassFactory(CustomTreeItemRenderer)}" labelField="@name" showRoot="false" variableRowHeight="true" width="200" height="350">
  <mx:XMLListCollection id="Characters">
   <mx:XMLList>
    <movie>
     <main name="Leon" height="25">
      <sub name="Mathilda" height="50"/>
      <sub name="Tony" height="75"/>
     </main>
     <main name="Stansfield" height="50">
      <sub name="Benny" height="100"/>
     </main>
    </movie>
   </mx:XMLList>
  </mx:XMLListCollection>
 </mx:Tree>

Notice that the tree control has the attribute “variableRowHeight” set to true.  This is very important since it will allow all of the rows to be a different height.  We also set our data provider to have names which will be used as our renderer’s label and heights which will be used to resize each renderer.

The next most important attribute here is the “itemRenderer” which is defined as new ClassFactory(CustomTreeItemRenderer).  This means that we will be using a component called the CustomTreeItemRenderer as our itemRenderer.

Now, we must create the CustomTreeItemRenderer.  This will extend the TreeItemRenderer and will override two methods:

  • measure
  • updateDisplayList

The measure method simply measures all of the components within the renderer and sets their heights and widths.  Below we can see what our code must do:


override protected function measure():void{
    super.measure();
    //Check to make sure the data is initialized
    if(data && data.@height > 0){
        this.measuredHeight = data.@height;
    }
}

Above, you can see that the code is simply setting the measuredHeight of our renderer to the height that was defined in our tree’s data provider above. The @ sign in from of the height attribute is used since we are extracting data from our XML based dataprovider rather than an Object based dataprovider.

Now, that the height is set, we need to override the updateDisplayList method so that we can correctly layout out newly resized component.


override protected function updateDisplayList(unscaledWidth:Number,
                                                      unscaledHeight:Number):void{
    super.updateDisplayList(unscaledWidth, unscaledHeight);
    //Check to make sure the data is initialized
    if(data && data.@height > 0){
        //put the label at the correct y coordinate based on the height
        label.y = (data.@height / 2) - (label.measuredHeight /2);
    }
}

We can see in the code above, that we are setting the label’s y coordinate based on the new height of the renderer. This is necessary in order to vertically align our label within the new larger renderer.

That’s it. We now have Flex Tree with variable height rows!

See the sample below which will allow you to download the source by right clicking:

adminadmin

Apache Flex to use Git

There was a very active and discussed vote in the Apache Flex community as to what source control tool Flex would use going forward.  The battle was mainly between sticking with SVN or moving over to Git.  Based on overwhelming community support many Apache binding voters actually switched their vote to Git.  It was a very impressive display showing that the current decision makers for Apache Flex are very supportive of the community and can be persuaded based on the community’s wants and needs.

adminadmin